
In Windows, to change the IP address from Control Panel is quite easy, but when the IP needs to be changed often then it goes back on the command line because is easy to be saved as a .bat or .cmd file and can be executed as many times as needed.
How to change computer’s IP address from command line
The command line tool used to change the IP is netsh which allows you to configure just about any aspect of your network connections in Windows. In order to use the tool the command line needs to be started as Administrator:
- in Windows 10 or 8.1, right-click the Start menu (or press Windows+X on your keyboard) and choose “Command Prompt (Admin).“
- In previous versions of Windows, search Start for “command prompt” and then right-click the result and choose “Run as Administrator.“
Step 1 – View Your Network Information
To change the IP address first you need to find the full name of the network for the interface you want to do the change. For this, type the following command:
netsh interface ipv4 show config
The result of the command will display all the network interfaces available on the computer.
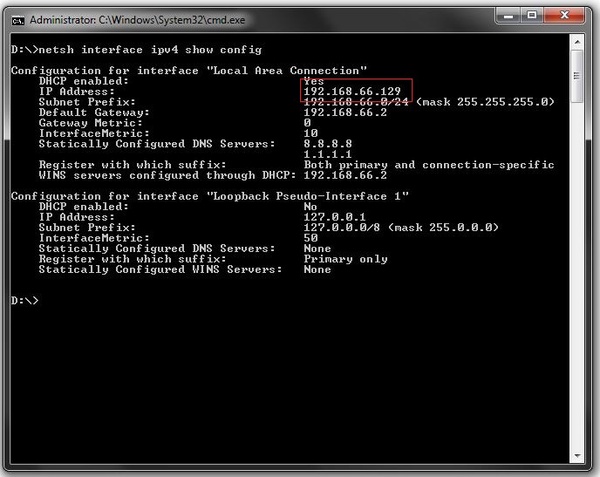
In my case, I am looking for the “Local Area Connection”. My current IP address is 192.168.66.129.
Step2 – Change IP Address, Subnet Mask, and Default Gateway
The syntax to change the IP is:
netsh interface ipv4 set address name="THE INTERFACE NAME" static IP_ADDRESS SUBNET_MASK GATEWAY
For my case:
netsh interface ipv4 set address name="Local Area Connection" static 192.168.66.100 255.255.255.0 192.168.66.2
Note: to still have internet connectivity I will use the same Default Gateway.
If you need to change the IP to automatic run the following command:
netsh interface ip set address "Local Area Connection" dhcp
Step 3 – Check the Configuration
To check the configuration we check again the settings by running the show config command:
netsh interface ipv4 show config
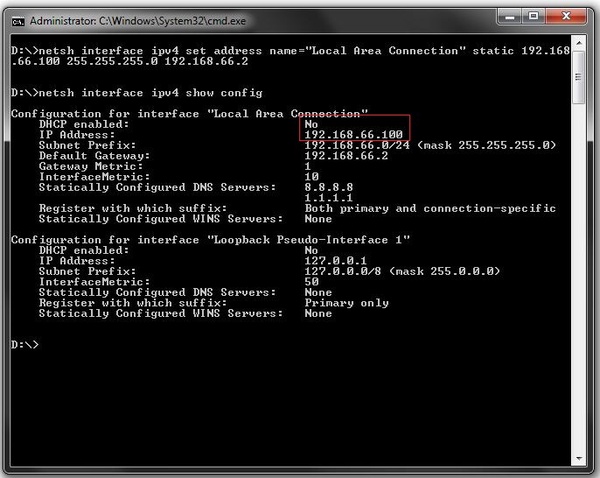
You can notice the change of the IP address for the “Local Area Connection” interface.
Step 4 – Add the commands in a .bat file(optional)
The .bat file will contain the command to change the IP followed by the show config command to see the changes directly on the console. For the.bat file to be successfully executed needs also to be under Administrator rights.
netsh interface ipv4 set address name="Local Area Connection" static 192.168.66.100 255.255.255.0 192.168.66.2
ping -n 3 127.0.0.1 >nul
netsh interface ipv4 show config
Note: the ping command is just to wait 3 seconds until the show config command is called. without it, you might not have all the info. Running again the show config command will display the info correctly.
How to change DNS settings from command line
In Windows, to change the DSN settings from Control Panel is quite easy, but when the settings need to be changed often then it goes back on the command line because is easy to be saved as a .bat or .cmd file and can be executed as many times as needed.
The command line tool used to change the DNS settings is netsh which allows you to configure just about any aspect of your network connections in Windows. In order to use the tool the command line needs to be started as Administrator:
- in Windows 10 or 8.1, right-click the Start menu (or press Windows+X on your keyboard) and choose “Command Prompt (Admin).“
- In previous versions of Windows, search Start for “command prompt” and then right-click the result and choose “Run as Administrator.“
Step 1 – View Your Network Information
To change the DNS settings first you need to find the full name of the network for the interface you want to do the change. For this, type the following command:
netsh interface ipv4 show config
The result of the command will display all the network interfaces available on the computer.
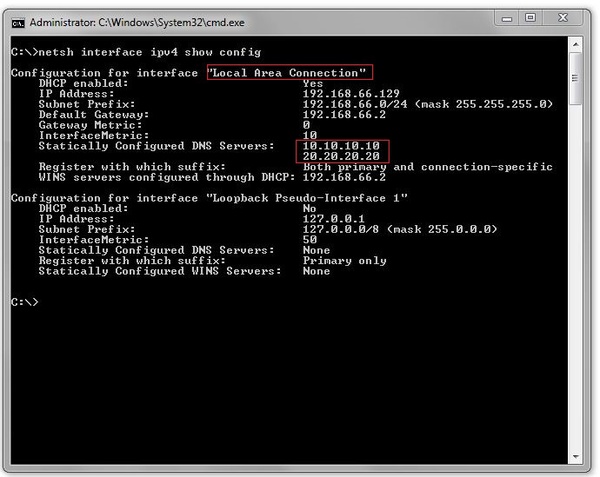
In my case, I am looking for the “Local Area Connection”. You can also see the current DNS settings of 10.10.10.10 and 20.20.20.20.
Step 2 – Change Your DNS Settings
The syntax to change the primary DNS settings is:
netsh interface ipv4 set dns name="THE INTERFACE NAME" static DNS_SERVER
to add a secondary DNS server the syntax is:
netsh interface ipv4 add dns name="THE INTERFACE NAME" DNS_SERVER index=2
Note the add instead of set and the index=2 at the end.
For my case I will change the primary DNS to Google’s primary public DNS:
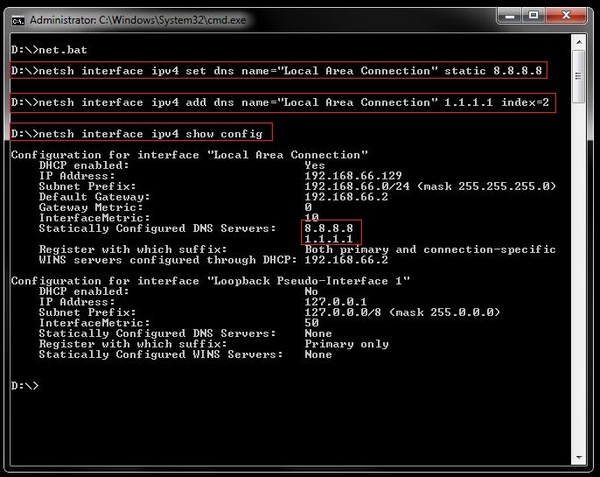
netsh interface ipv4 set dns name="Local Area Connection" static 8.8.8.8
and the secondary DNS to Cloudflare’s public DNS:
netsh interface ipv4 add dns name="Local Area Connection" 1.1.1.1 index=2
Step 3 – Check the Configuration
To check the configuration we check again the settings by running the show config command:
netsh interface ipv4 show config
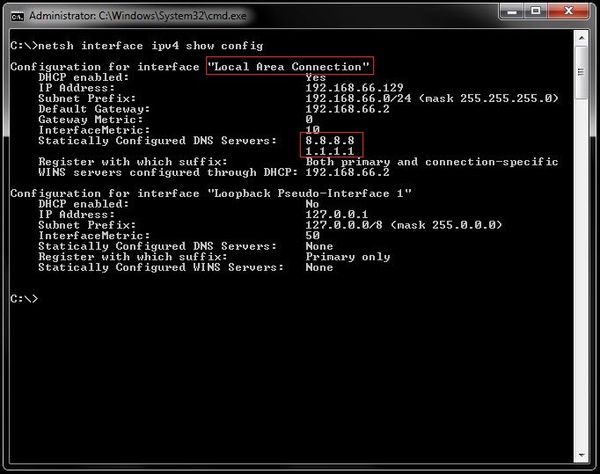
You can notice the change of the DNS settings for the “Local Area Connection” interface.
Step 4 – Add the commands in a .bat file(optional)
The .bat file will contain both commands for primary and secondary follow by the show config command to see the changes directly on the console. For the .bat file to be successfully executed needs also to be under Administrator rights.
netsh interface ipv4 set dns name="Local Area Connection" static 8.8.8.8
netsh interface ipv4 add dns name="Local Area Connection" 1.1.1.1 index=2
netsh interface ipv4 show config

One thought on “How to change IP/DNS settings from CMD”
You want pornhub? Hahaha… Malaysia total block it now.. dns fail now